How I Built My Keg’s Force Carbonation Station
A few months ago, I decided that force carbonating my kegs from inside my kegerator was beginning to be too much work. The single set of CO2 lines weren’t quite long enough to stretch outside the fridge for proper moving of the keg. In addition to that, if I happened to already have a keg in the refrigerator for serving, then I had to disconnect everything to force carb the new one.
If you happen to keg your home brew (you definitely should be), then there are a few ways to carbonate the beer after filling:
- Naturally with the end of fermentation. This is possible if you have a spunding value and ferment inside the keg.
- In the keg fridge, slowly. This can take upwards of a week to do, but does the job well. Leave your beer attached to the CO2 source at serving pressure (10-12 PSI) for about a week or so to properly carbonate.
- Force Carbonation. Attach your just-filled keg to the CO2 source at a very high pressure – somewhere around 30-40 PSI. Shake, rattle and roll that keg to help dissolve the CO2 into the beer, and leave it attached to the high pressure for 12-24 hours in the fridge.
Its this last option that I usually choose, so I wanted to build a dedicated setup that allowed me to force carbonate my kegs easily. Here is how I did it…
Materials Needed
The materials list is not much at all. My original setup was a single CO2 line going from the regulator directly into the fridge and attached to the keg. That line wasn’t long enough to begin with, so I decided to scrap it and replace the whole CO2 line system with this build.
The items I needed to purchase totaled about $45 in total. They included:
- A CO2 Manifold – I got a 3 port just in case I ever wanted to turn my single tap kegerator into a dual tap, but for this exact build you really only need two ports.
- 10 ft of Red 5/16 ID x 9/16 OD PVC tubing
- Gas Disconnect – My kegs have ball lock posts, so I got that kind. If you happen to have pin locks, make sure you get that kind.
- Some small hose clamps if you don’t already have them. Some of the products I’ve linked to above actually come with a couple, so that’s a nice bonus.
A Note About the Gas Disconnect
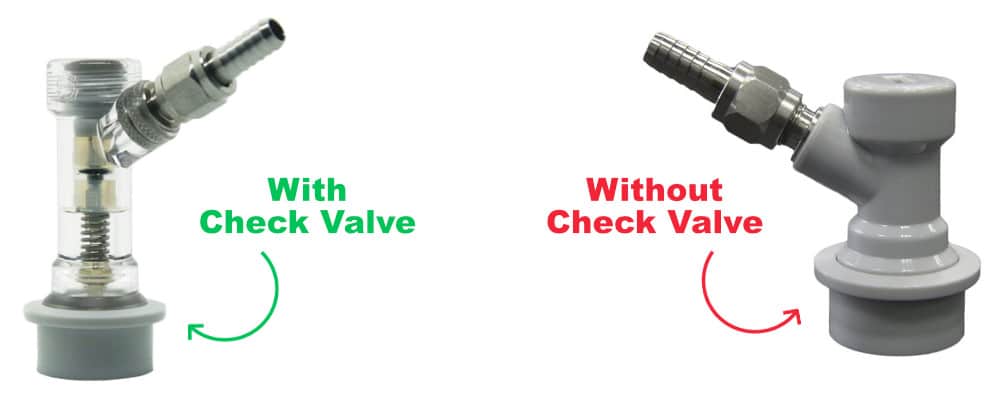
I wish I had bought the kind with the check valve instead. The disconnects with and without the check valve are virtually the same price, and was a mistake on my part. The check valve has an internal setup that allows gas into the keg, while preventing beer from seeping back out into your CO2 lines. As you shake your keg during the force carbonation process, the chance that beer backflows into your CO2 line drastically increases.
Assembly
Assembling the force carbonation station (I very much like that term), was fairly easy and only took about 20 minutes.
First, I disconnected the old CO2 line from the regulator and disposed of it. It was dirty and original to my kegerator and was the only line I hadn’t replaced yet.
Next, I cut the 10ft red PVC line into three sections: two 4′ long lines for the serving keg and force carbonation pieces, and a 2′ line to go between the manifold and CO2 tank.
I then attached the manifold to the side of my bar‘s shelving area. I had to swap the input barb & stopper plug locations because my CO2 line needed to come in from the right-hand side. Of course, your setup may be different, but just know that the two ends of the manifold can come out and swap if needed.
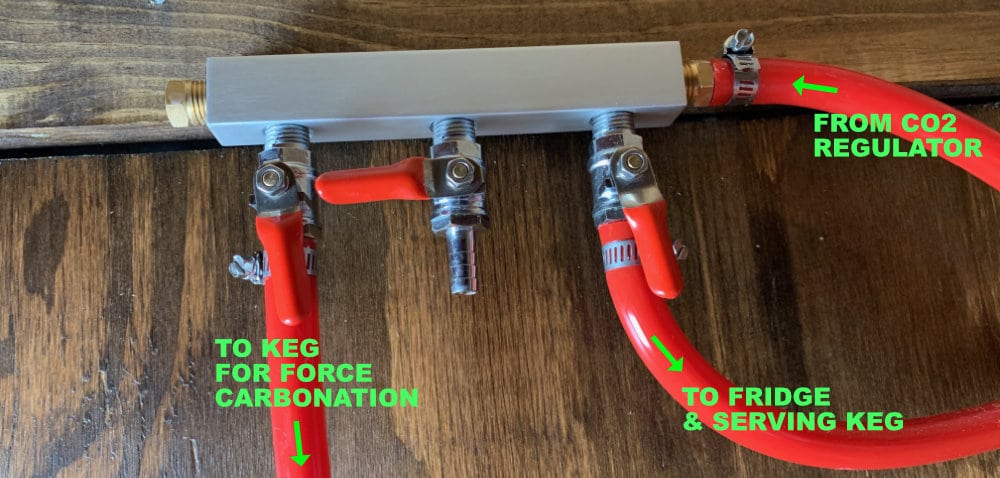
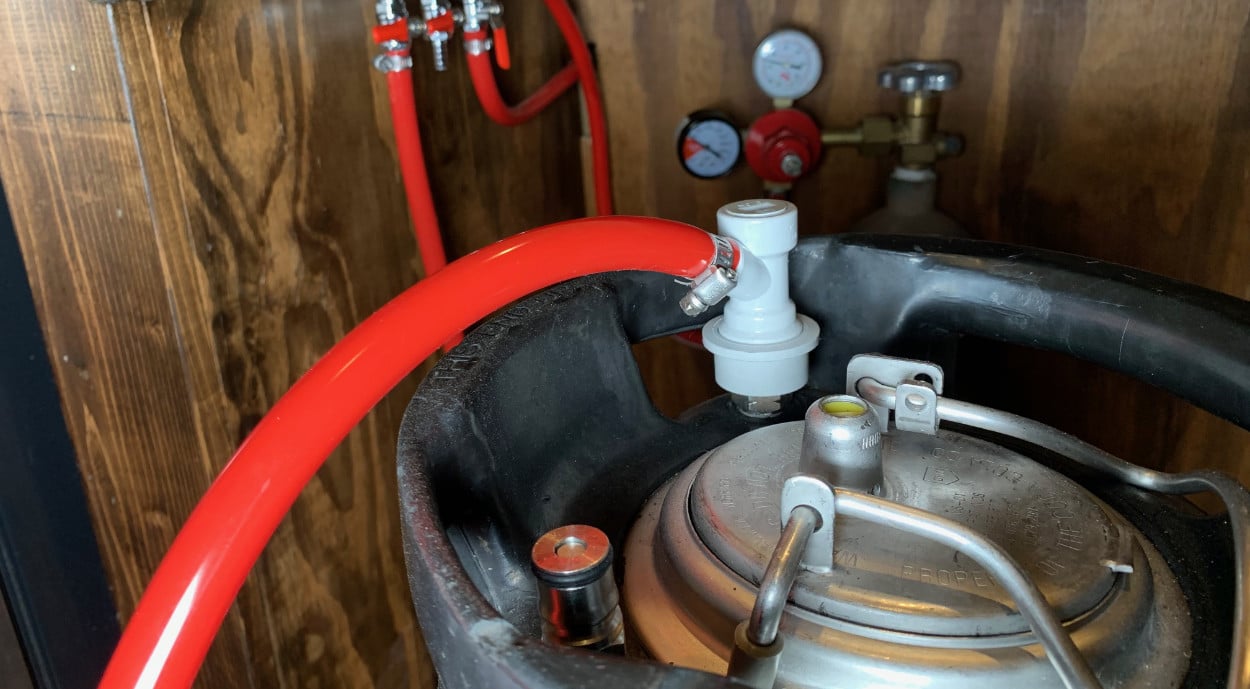
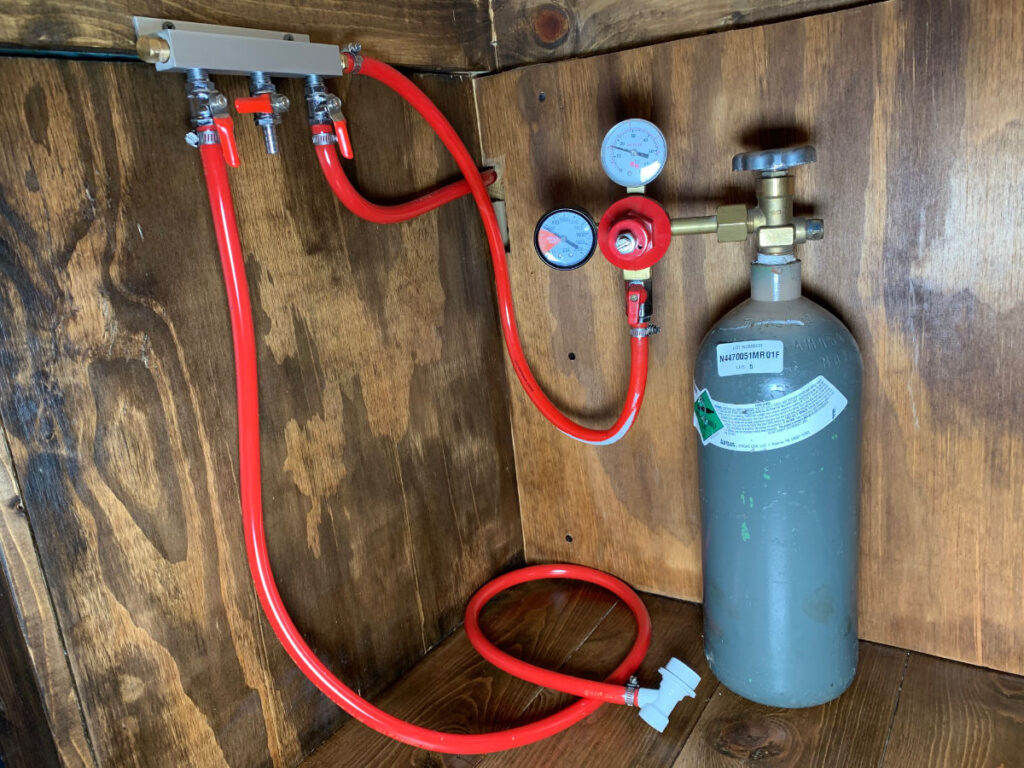
Next came connecting the red PVC lines (see Figure 1). I squeezed the two 4′ lines over two of the output barbs and secured them with hose clamps. At the end of each of the lines, I connected the new gas disconnects. I then connected the manifold and CO2 regulator with the shorter line. I cut a short If you happen to have bought a disconnect with a check valve, add that one to the line OUTSIDE the keg fridge. We want to make sure the check valve is being used for the force carbonation line.
Finally, it was time to test the setup for leaks. I like to use soapy water on each of the connections to make sure we don’t have any CO2 leakage. Apply a small amount of soapy water to each connection and open up the CO2 regulator to a fairly high (30-40) PSI. Bubbles will form where there is leakage. If you happen to have any, just tighten either the clamps, barbs or plugs – wherever the leak is occurring.
The final setup for me looks like this:
How to Use the Force Carbonation Station
To force carbonate my home brew kegs, I connect the gas disconnect with the check valve to my newly filled keg, then open the manifold lever. I usually keep that lever closed while its not in use, but accidentally leaving it open has not caused any CO2 loss, so I think it is more of a second precaution than anything.
After the gas line is connected to your keg, turn the gas supply up to 30-40 PSI. Then, gently shake the keg to stir up the beer inside. You should immediately hear bubbling within the keg. Agitating the keg by shaking or rolling it increases the contact area between the CO2 and beer even further, promoting faster dispersion of CO2 into the beer.
Continue to shake the keg for 10 minutes then lower the pressure to 20 PSI. Allow the keg to sit untouched to carbonate for 1-3 days. Periodically test the beer to make sure it is not over carbonating, because that mistake is hard to fix.
Possible Upgrades
The first upgrade would be to have used the check valve gas disconnect over the basic one.
The second upgrade would be to add a second CO2 regulator into the setup.
Right now, as it is shown above, the serving keg and keg you are force carbing are getting the same amount of CO2 pressure. If you force the same amount of CO2 into your serving keg (assuming you have one in there at the same time), then you are going to over carbonate it. A new regulator costs about $55, and I didn’t want to spend that extra cash. I instead just close the manifold switch to the inside keg while I’m force carbing. Just as long as I don’t use the serving keg too much, everything is fine. I’ll open up the serving keg’s manifold once I’m done force carbing.
