How to Fix an Over Carbonated Beer
We’ve all been there. You spent hours brewing your next favorite batch, and mistakenly pumped it full of too much carbon dioxide (CO2). Overcarbonated beer makes it taste too sharp on the tongue, is wasteful due to too much foam, and can certainly alter the flavor you’ve worked so meticulously on crafting. Most people know this has happened to their homebrewed beer when it explodes once opened.
I once over carbonated a New England IPA I brewed, and it ruined it completely. Certain styles of beer require less carbonation, and can be easily ruined with too many bubbles.
There are two ways to carbonate a beer:
- Bottle Conditioning – This method requires the addition of extra sugar at bottling time, usually dextrose, which the yeast left over in the beer consume and create CO2. That CO2 has nowhere to go once sealed in the bottle, so it is dissolved back into the beer.
- Keg Forced Carbonation – This method is only available to those with a keg setup. It uses a CO2 canister to force the gas into the kegged beer.
While both of these methods are fairly forgiving in nature, over carbonation can happen if we aren’t careful.
How Over Carbonation Happens

Over carbonating a beer is something that should only really happen if you are careless. 9 out of 10 times, it is due to sloppy measuring of corn sugar or mistakenly setting the keg’s CO2 regulator too high.
That other 10% of the time is usually because of the dreaded infection. However, you will know immediately if the foam is due to extra CO2 or an infection by tasting it. If it has an off taste, more than likely it is an infection. Fortunately, this doesn’t happen much – and with liberal and detailed use of a sanitizer like StarSan, it should never happen.
In a Keg
This happens when your CO2 tank was set to high when force carbonating your keg. This is really the only way a keg can become over carbonated, and if it wasn’t set too high, then your problem lies elsewhere. Over carbed kegs usually happen when home brewers attempt to force carb their kegs. This involves setting the CO2 regulator extremely high – like 30-45PSI – and leaving it at that pressure overnight. While much quicker than the slow-and-steady option, this method can quickly force too much CO2 into your beer if you aren’t careful.
I usually force carb my kegs at 25PSI overnight (approximately 24 hours), then drop it down to 10-12PSI. This ends up being the best of both worlds: It shaves off a couple of days by doing the initial carbonation, but doesn’t risk adding too much. However, the downside is that it can’t be drank for a 2-3 days.
In a Bottle
If you’ve bottled a batch of beers, and they start exploding or gushing immediately upon opening it up, you likely made a mistake somewhere. Usually this happens due to one of three reasons:
- Added too much priming sugar. Now, this can because you don’t know how to measure, but more than likely it’s because the priming sugar calculator isn’t exact. Sometimes it takes a few tries to get your specific style’s carbonation levels perfected, but I find that 5 ounces per 5 gallons always works. It seems to be the perfect middle ground for all styles.
- Didn’t mix the priming sugar enough. Most home brewers that bottle will siphon their beer from the fermenting vessel to a bottling bucket before filling the bottles. The key is to add the priming sugar first, so the siphoning appropriately mixes the priming solution into the rest of the beer.
- The beer wasn’t done fermenting yet. First time home brewers are usually very impatient to start drinking their beer, so they rush things. The result is the bottling of beer that has not yet allowed the yeast to attenuate fully. Most beer recipe apps like Brewer’s Friend will tell you the estimated final gravity (FG) of the brew. You will need to wait for your beer to hit that value before bottling. If you don’t, the yeast will continue to chew through the left over sugar in the beer AND the priming sugar, resulting in too many bubbles.
How to Properly Bottle Condition a Beer
First, its important to know the right way to bottle condition a beer.
In order to properly bottle condition a beer, you’ll need to first use a beer priming sugar calculator to identify how much dextrose you need to add to your beer before bottling. Estimating the amount of sugar is not advised – always use a calculator!
Once the sugar is added, you should just bottle your beer, leaving between one-half to one inch of headspace at the top of the bottle. Once all your bottles are filled and capped, the key here is to be patient. Most bottles will be fully carbonated within 2 weeks, but it depends on the ambient temperature of where you store the bottles. The warmer it is, the quicker your bottles will condition.
How to Reduce Carbonation in Beer
All is not lost if you’ve accidentally over-bubbled your beer. While it may take a bit of work to fix, there are some steps that can likely reduce the carbonation level. This will not be an exact science as adding the carbonation is, so you’ll likely have some trial and error before you are able to get it right.
In a Keg
If you are working with a keg setup, reducing the carbonation level can be achieved a couple ways. Luckily corny kegs are pressure rated up to 130PSI, so there is little chance that there is a safety issue here.
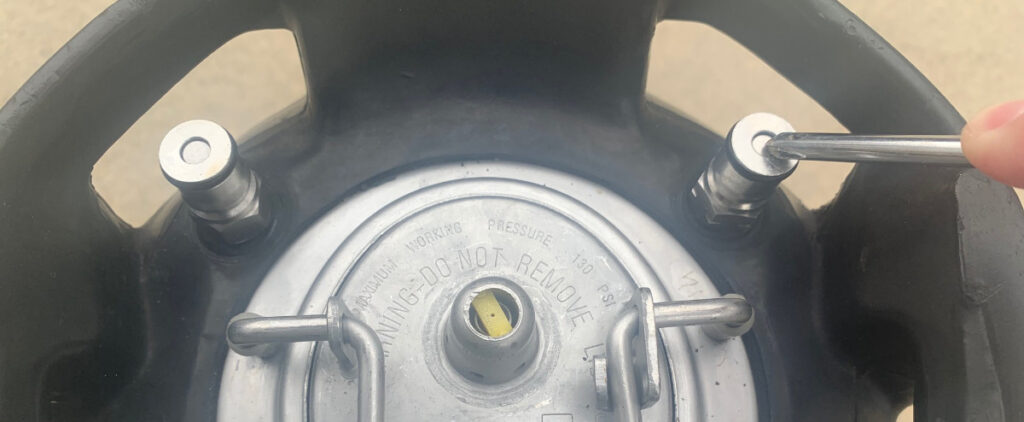
- Purge Headspace & Shake Keg. First, you’ll want to disconnect the gas line from the keg. Next, pull the pressure release valve (PRV) on your keg to let out any built-up pressure. Some corny kegs don’t have PRVs, so you’ll need to use a screwdriver and depress the poppit on the “gas in” post.
After releasing the pressure, gently shake your keg back and forth a few times. This will agitate the beer, which will force it to release some of its dissolved CO2 gas. After shaking 5-6 times, pull the pressure release valve again. This can be repeated a few times.
After you’re done shaking and releasing, let the keg sit untouched in the kegerator a few hours, still without the gas line attached. At the end of the wait, reattach the gas line with the CO2 pressure set to around 10PSI or so. - Double Check Keg Setup. Sometimes the excessive foam is not due to over carbonation. Keg lines that are not an optimal length will cause most of your pour to be foamy. Beer lines have a specific length they need to be to reduce foaming, which is usually around 8 feet. Kegerators.com has a handy calculator that will help you dial in the exact length.
Besides line length, sometimes only a couple PSI difference in gas pressure will make a huge difference. My CO2 tank’s outgoing pressure is usually set at around 10PSI for dispensing beer. Any more than that will cause the first third of my glass to be foam.
In a Bottle
It is much easier to fix an over carbonated keg. Bottles are difficult to fix, but you still have a few options. None are going to be great or a quick fix, but you can likely save them – assuming they haven’t exploded already. Unlike a keg, too much carbonation in a bottle can cause it to explode.
The difficult part here is that you likely won’t know a bottle is over carbed until 1) it explodes on you, or 2) it gushes everywhere once you pop the cap. However, if one bottle is over carbed, then it is highly likely that the whole batch is as well.
To fix an over carbonated bottle, try these methods.
- Get it Super Cold. This won’t necessarily reduce the carbonation, but it will prevent a volcano from erupting once it is popped. Beer at or near freezing temperature will foam much less after being opened, allowing you to pour most of it into a glass, then letting it degas as it warms up to serving temperature.
- Time Heals All Wounds. Well, maybe not all wounds, but the longer a gusher beer sits in the refrigerator, the less carbonated it will be once it comes out. Plus, beer sitting in the fridge will not create more carbonation since the yeast go dormant at those temperatures.
- Re-Cap Bottles. This is the most time-intensive process, but the only true way to fix over carbonated bottles. Your best option here is to put the bottles in the fridge overnight, as this will reduce the foaming once you crack them open.
As you open each bottle, cover them with sanitized tinfoil (not plastic wrap… we don’t need the tops perfectly sealed off) and let them sit for anywhere between 1-4 hours. The beer will begin to degas naturally. After time has passed, recap them all with new bottle caps. Do not try to save a few bucks and reuse the old ones – I’ve never had that actually work. - Re-Seat Bottle Caps. I do not prefer anyone to go this route. It is simply too risky that you don’t reseat the bottle cap into a new and perfect seal. But if you must, you can barely pry open the bottle cap to allow the CO2 from within the headspace to escape bottle, then quickly push it back in place. Keep your bottle-capper nearby if needed, but you shouldn’t really need it if you pry the cap open just enough to release the gas before pushing it back on.

